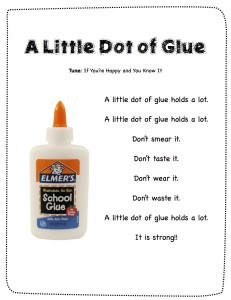
Teaching young children how to use glue can be as simple as a song and strong visual instructions. Just click on the image to download a copy of this song. My co-teacher, Patty, has a wonderful additional line I have never heard – “It is strong!” The children love it! We make a strong gesture with our arms.
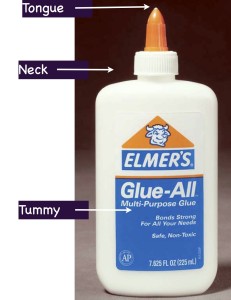
I call the glue bottle “Mr. Glue” and use these terms the first time I show the children how to use the bottle. (See photo below.)
- To open the bottle, twist the orange cap until the “white tongue disappears.”
- Do not twist Mr. Glue's neck.
- Softly squeeze his tummy. One small squeeze will make one little dot.
- To close the bottle, twist Mr. Glue's cap until you see the white tongue.
I break it down to three simple steps (the best number of steps for memory):
- Twist the orange cap.
- White tongue disappears.
- Squeeze one little dot.
Giving these visuals really helps young children picture what they need to do.
Be Researchers!
I love this first glue project from Patty. This is a wonderful way to practice using a “little dot” and seeing if it really is “strong.” The class checks to see if a little dot of glue will actually hold a lot.
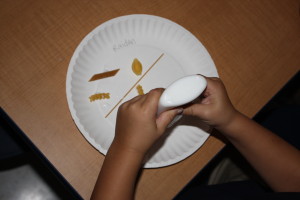
Set out an assortment of pasta.
Give each child a bottle of glue and a paper plate.
The children use a little dot and place a piece of pasta on the dot.
They may glue as many pieces of pasta as they wish. Let it dry overnight.
The next day – let the children hold their paper plate and see – did the little dot of glue hold the pasta?
It is strong!!
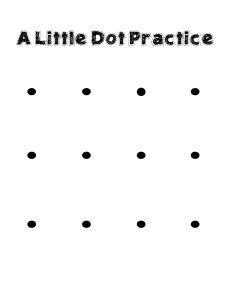
A Little Dot of Glue Practice:
This can help the children control the squeezing of the glue bottle.
The children make a little white glue dot on each black dot.
Practice a second time and let them glue little tissue paper squares on each little dot.
Enjoy!




What a great song! Love it! I’m going to link to this awesome idea in an upcoming post I’m writing for my blog! I haven’t used liquid glue with my son yet, but I think I will try it out now.
Wonderful tutorial, but I wanted to feedback on the use of pasta. Hopefully the pasta used was past its use by date, as the use of food for play is not sustainable .
Absolutely – we collect old pasta from a local grocery store.
I love the glue dots!!! 37 years of teaching, finally I am taught the simplicity of glueing. I shared this with my team. Hugs
Children can practice fine motor skills, while learning a technique they can use in many, many projects.
Absolutely! So many skills, so much glue! Also, we might feel a little better about using the glue more often if we know our children know how to use it appropriately!
I love the song! And the tummy of Mr. GLUE
I’m actually of two minds when it comes to glue. In my experience, children have a great need to explore with glue and that means immersing their hands in it, squeezing out pools of it and letting it ooze out onto the table and floors ?
While it is valuable to learn the steps to of proper glue use, children need the stage of messy exploration
I really like the visuals and the little song attached to the exercise. What a great way to get a point across.. Thank you
This is a great little song and technique for teaching kids how to use the glue. Although, I heard someone say, at a conference, to manage the classroom not the kids. So instead of the squeezable glue I use liquid glue and paint brushes or those little plastic glue stick with the flat paddle end. I work with some young children and some children that would just squeeze the bottle anyway because, let’s face it…squeezing it is fun!! 🙂
Haha – I have actually set up squeezing trays for that very purpose!!
Squeezing trays? I am interested to know more… Have 2 year olds that would probably Love the idea!!!
I just get a few metal or plastic trays, darker plastic cafeteria trays work best, and let the children squeeze, squeeze, squeeze! I keep my eyes open for a good glue sale. I can usually find bottles of glue on sale at the beginning of the school year and I buy a TON! The children get lost in the task of squeezing the bottle and watching the glue come out of the bottle. It’s so much fun!
Very nice song and activities! We use glue a lot- “just a drop, not a lot” is softly chatted from our art tables. I so agree to teach our students the basics of glue! Please also note, I notice that some types of glue have a bleaching effect after we made a beautiful art project. The glue created faded spots on the watercolor and fingerpaint papers.
I’m a fan of Tap N Glue caps. They fit on Elmer’s or generic glue bottles, and require a child to squeeze while touching the glue top to the paper (or other media). No endless squeezing is possible, but you can certainly get fairly big “dots” once you get the hang of it. (You can see them on Amazon, but do not be fooled by the prices there! You can find them for a couple dollars elsewhere)
Thanks for the tip! (No pun intended!)
This is wonderful, thanks.
I sing “A dot of glue will do, a dot of glue will do, if you want to stick it on, a dot of glue will do” and my kids are still singing this years later in elementary school 🙂
Love the idea of teaching glue with small children.
Loved the practice glue dots and idea to do a 2nd time with tissue paper. I put 10 dots vertically in the middle of paper landscape orientation and plan to use activity to assess writing name, identifying letters in name, following 3 step directions, counting to 10 and lastly number recognition as I randomly write numbers under the dots.
Disappointed with song as my background with extra special children as taught me to tell them what to do and to avoid don’t when possible. Wonder if song could be modified to incorporate 3 simple steps. Something like: A little dot of glue holds a lot, A Little dot of glue holds a lot; Twist the orange cap and see the white disappear, gentle squeeze the middle one little dot appears; Now you are ready to glue and decorate, A little dot of glue is great:) Just a thought thanks for sharing little dot ideas.
Great idea to adapt song into three simple steps. Thank you so much for sharing.